Record System Audio on Mac: Easy Guide to Screen Recording
Ever found yourself wanting to capture the audio playing on your Mac? Whether it's a must-keep piece of music, a crucial webinar, or just the satisfying sounds of your gameplay, recording system audio can be incredibly useful. Fortunately, Mac users have several straightforward options to do just that. In this guide, we'll walk you through how to easily record system audio on your Mac, covering both built-in tools and third-party applications.
Why Record System Audio?
Recording system audio isn’t just about keeping a copy of what you hear. It can be about preserving memories, creating content, or even educational purposes. Whether you’re a content creator looking to incorporate system sounds into your videos, a student recording lectures, or someone trying to capture audio clips from the web, understanding how to record system audio effectively is a valuable skill.
Checking Your Mac’s OS Compatibility
Before diving into recording, ensure your Mac’s operating system (OS) supports the methods we’ll discuss. Most techniques work on macOS Mojave (10.14) and later, but it’s always a good idea to check your system’s compatibility with any application you plan to use.
Necessary Tools and Applications
- QuickTime Player
QuickTime Player, pre-installed on all Macs, offers a simple way to record both video and audio. While it can’t capture system audio directly out of the box, we’ll show you a workaround using this tool.
- Third-Party Applications
For those needing more robust features, several third-party applications offer enhanced audio recording capabilities. We’ll cover some of the most popular options and how to use them.
Record System Audio: Step-by-Step Guide
Let’s dive into the actual process of recording system audio. We’ll start with the basics using QuickTime and then explore more advanced options with third-party apps.
Using QuickTime for Simple Recordings
- Setting Up
- Open QuickTime Player.
- Navigate to “File” > “New Audio Recording.”
- Recording Process
- Click the record button to start capturing audio.
- To stop recording, click the button again.
This process captures audio through your Mac’s microphone by default, which isn’t ideal for system audio. We’ll need to employ a workaround or use third-party software for direct system audio capture.
Using Third-Party Applications to Record System Audio
Applications like Soundflower (free), blackhole-16ch Audio Hijack (paid) offer more control over audio recording, allowing you to capture system audio directly. Here are the steps for using blackhole-16ch to record system audio on MacOS.
- Download and install blackhole-16ch.
brew install --cask blackhole-16ch
- Open QuickTime Player.
- Navigate to “File” > “New Audio Recording.”
- Select blackhole-16ch from the list
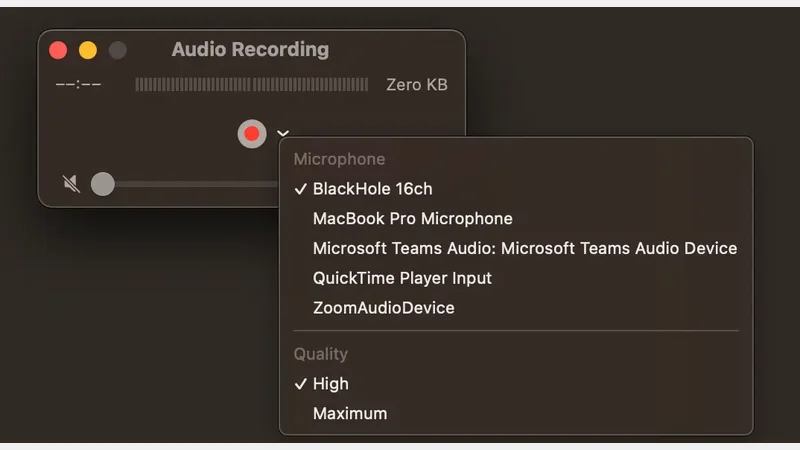 Record System Audio on MacOS
- Select ‘Blackhole-16ch’ under sound in system preference.
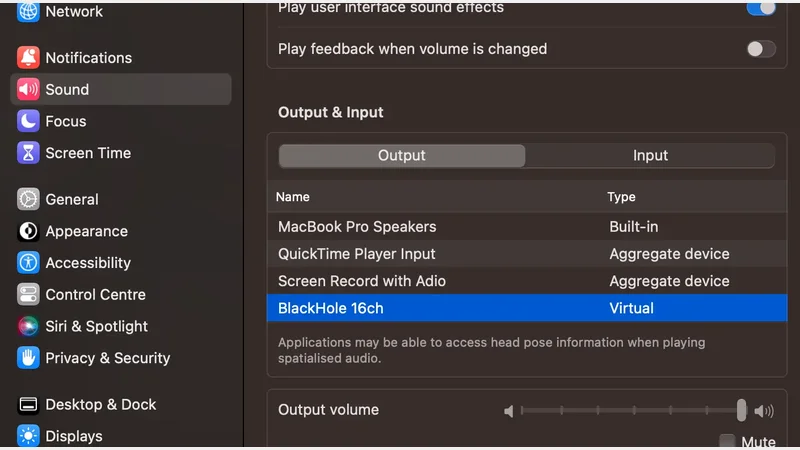 Enable System Audio on MacOS
-
Click on start recording in QuickTime Player.
-
Once recording has been completed, select ‘Macbook Pro Speakers’ under sound in system preference.
Tips for a Perfect System Audio Recording
Ensuring your audio recordings are clear and high-quality requires a few key considerations.
- Adjusting Input Levels
Too high or too low input levels can ruin a recording. Test and adjust these levels within your recording software before starting.
- Eliminating Background Noise
Background noise can be a significant issue, especially when not recording direct system audio. Use a quiet environment or software filters to minimize unwanted sounds.
This initial section sets the stage for the comprehensive guide on recording system audio on a Mac, covering the basics, tools, and steps involved. We’ll continue to expand on each section, addressing troubleshooting, post-recording enhancements, and wrapping up with FAQs to ensure readers have all the information they need to succeed.
Continuing from where we left off, we delve deeper into the complexities of recording system audio on a Mac, focusing on troubleshooting common issues, enhancing audio post-recording, and concluding with some useful FAQs.
Troubleshooting Mac System Audio Issues
Even with the best setup, you might encounter some hiccups while recording system audio. Here are quick fixes to common problems:
No Sound Captured
- Check Audio Source: Ensure the recording software is set to capture system audio, not microphone input, unless using a workaround with QuickTime Player.
- Volume Levels: Verify system and application volume levels are not muted or too low to capture.
Sound Quality
- Adjust Sample Rate: In your recording software, check if the sample rate matches your output device. A mismatch can result in poor quality recordings.
- Software Settings: Explore your application’s settings for noise reduction or quality enhancements that might be affecting your recording.
Enhancing Your Audio Post-Recording
Once you’ve captured the audio, you might want to clean it up or improve its quality. Here’s how.
Basic Editing Techniques
-
Trimming and Cutting: Use QuickTime Player or your third-party application to remove unnecessary parts from the beginning, middle, or end of your recording.
-
Volume Adjustment: Increase or decrease the recording’s volume to match other audio sources in your project.
Adding Effects and Filters
- Noise Reduction: Tools like Audacity (free) offer noise reduction effects to eliminate background hiss or hum.
- Equalization: Adjust the bass, mid, and treble frequencies to enhance your recording’s clarity or to achieve a desired sound.
Conclusion
Recording system audio on a Mac is a straightforward process, whether you’re using the built-in capabilities of QuickTime Player with a workaround or opting for the more advanced features of third-party applications. By following the steps outlined in this guide, adjusting settings for optimal recording quality, and troubleshooting common issues, you can capture clean, high-quality audio for any purpose. Remember, practice and experimentation with different tools and settings are key to mastering system audio recording on your Mac.
FAQs
Q: Can I record system audio on a Mac without additional software?
A: Yes, but it requires a workaround using QuickTime Player and possibly creating a multi-output device in Audio MIDI Setup for direct system sound capture.
Q: What are the best third-party apps for recording system audio on a Mac?
A: Soundflower (for routing audio) and Audio Hijack are highly recommended for their robust features and flexibility.
Q: How can I ensure the best audio quality when recording?
A: Use direct system audio capture methods, adjust input levels to avoid clipping, and record in a quiet environment to minimize background noise.
Q: Is it possible to record system audio and microphone input simultaneously?
A: Yes, some applications like Audio Hijack allow you to capture both system audio and microphone input in one recording.
Q: What should I do if my recording sounds distorted?
A: Check the input levels to make sure they’re not too high, causing clipping. Consider lowering the system or application volume and try recording again.
Comments
There are no comments yet.