Google Drive & Sheets APIs in Node.js: Step-by-Step Guide
Google Drive and Google Sheets stand as pillars of Google's versatile suite of services, offering users a seamless experience for storing and managing files and creating collaborative spreadsheets. One remarkable aspect of these services is the provision of robust REST APIs, empowering developers to programmatically manipulate files and folders with ease. This tutorial dives into the integration of Google Drive and Google Sheets APIs within an Express app driven by Node.js, providing a comprehensive guide on how to harness the functionalities offered by these APIs.
The spectrum of operations that can be performed programmatically is broad, covering essential tasks such as reading files, uploading new files, updating existing files, and deleting files or folders. Leveraging these APIs not only enhances automation but also opens up possibilities for creating tailored solutions that interact with Google Drive and Google Sheets.
By the end of this tutorial, developers will have a solid foundation in integrating Google Drive and Google Sheets APIs into their Node.js applications. This knowledge is invaluable for those seeking to build applications that require dynamic file management capabilities or collaborative spreadsheet functionalities. The tutorial serves as a practical resource, guiding developers through the steps necessary to implement these powerful APIs within the context of an Express app.
Before delving into Google Drive and Google Sheets APIs, it’s crucial to set up a few prerequisites. These preliminary steps pave the way for a seamless integration experience, allowing you to manipulate files and folders programmatically.
- Enable Google Drive API
- Enable Google Sheet API
- Create OAuth credentials (Client ID and Client secret)
Enable Google Drive API
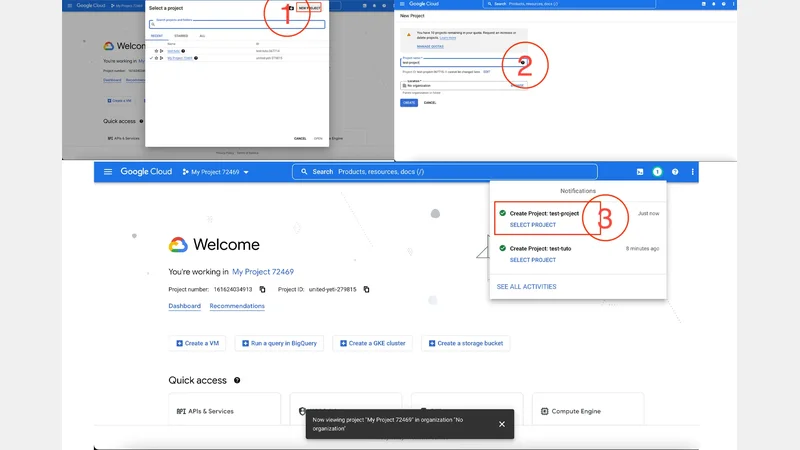
Enabling the Google Drive API is a fundamental step in integrating the robust file manipulation capabilities of Google Drive into your application. To embark on this journey, you need a Google Cloud project and OAuth credentials. The process begins by navigating to the Google Cloud Console, where you can create a new project.
Upon reaching the Google Cloud Console, initiating the creation of a new project is a straightforward process. Click on the create a new project option, and a form will appear prompting you to fill in the necessary details. For instance, you can designate a project name, such as “test-project,” and the organization field can be optionally skipped. Once the essential information is provided, click on the “Create” button to instantiate the project.
This newly created Google Cloud project serves as the foundational infrastructure for leveraging the Google Drive API within your application. It acts as a dedicated space where you can manage resources, configure settings, and integrate various Google Cloud services. With the project in place, the subsequent steps in your journey toward harnessing the power of the Google Drive API involve configuring OAuth credentials, enabling the API for the project, and unlocking a spectrum of possibilities for programmatically manipulating files and folders on Google Drive.
- Project name: test-project
- Organization: Can be skipped
- Click on the “Create” button
 Create a new Google Could console project
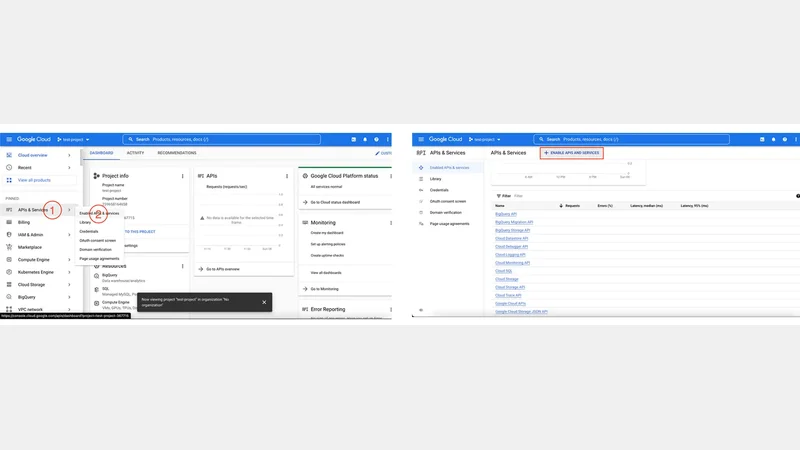
Once you have successfully created a new project on the Google Cloud Console, the next step is to enable the Google Drive API. This process involves a few straightforward steps to ensure seamless integration and utilization of Google Drive’s powerful functionalities within your project.
To commence, navigate into the newly created project within the Google Cloud Console. Once inside the project, explore the left panel, where you’ll find the “APIs & Services” section. Click on “ENABLE APIS AND SERVICES” to initiate the process of enabling APIs and services for your project.
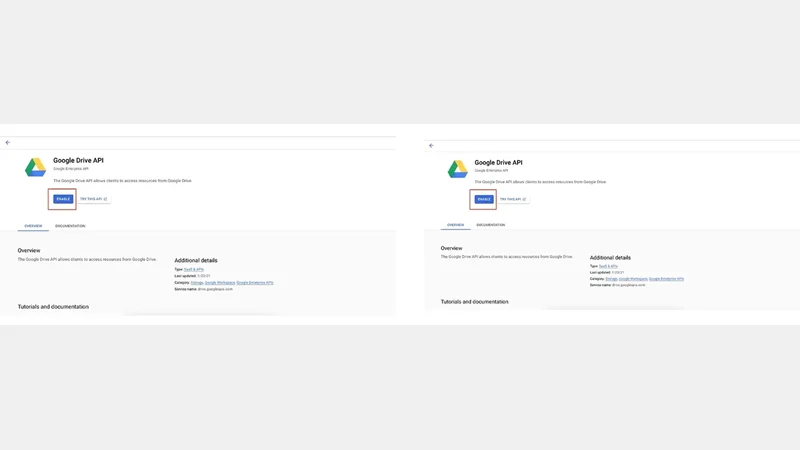
Upon clicking the “ENABLE APIS AND SERVICES” option, you will be directed to a new page. Here, select the “Google Drive API” option, marking a pivotal moment in configuring your project to interact with Google Drive programmatically. Click on the “Enable” option to activate the Google Drive API for your project.
As you click “Enable,” the system will take a few moments to process and enable the Google Drive API. This brief pause is a necessary step to ensure that the API is fully operational and ready to be leveraged within your project. Once the enabling process is complete, your project is now equipped with the capabilities to interact with files and folders on Google Drive through the robust Google Drive API.
 Create credentials in Google API
 Enable Drive API
Enable Google Sheet APIs
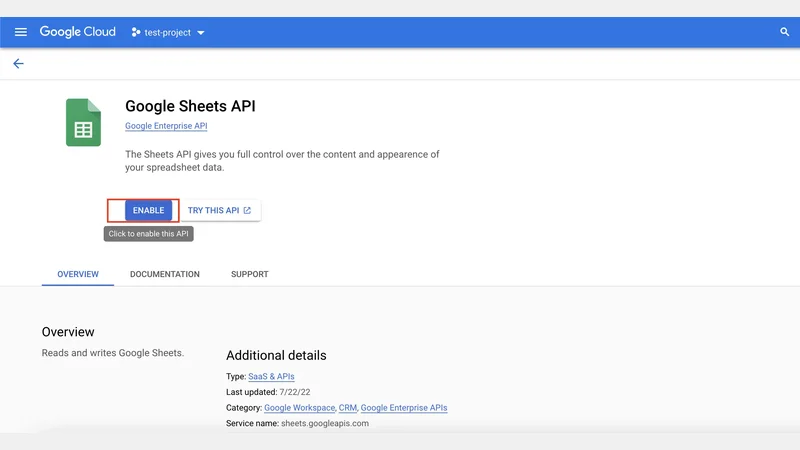
Enabling the Google Sheets API is the next step to harness the power of Google Sheets within your project. This process involves a series of simple yet essential steps that ensure the integration of Google Sheets API functionalities into your Google Cloud project.
To initiate the process, return to your project within the Google Cloud Console. Once you’re back in your project space, locate and click on the “Go to APIs Overview” option. This will direct you to a comprehensive overview of the APIs associated with your project, setting the stage for enabling the Google Sheets API.
In the subsequent step, navigate to the left panel and click on “Library.” Here, you’ll find a list of APIs that can be integrated into your project. Go through the options to locate the “Google Sheets API” suite. Once identified, click on it to access the details and configuration options specific to the Google Sheets API.
Having selected the “Google Sheets API” suite, click on the “Enable” button to activate the API for your project. This action initiates the enabling process, which may take a few moments. As the API is being enabled, your project becomes equipped with the capabilities to interact with Google Sheets programmatically. This integration opens up possibilities, allowing your application to read, update, and manipulate data within Google Sheets.
 Enable google sheet API
Create OAuth credentials for Google Drive APIs and Google Sheet APIs
Creating OAuth credentials for Google Drive APIs and Google Sheet APIs involves a structured process with several configuration steps. Following these steps meticulously ensures the secure and efficient integration of OAuth client ID and client secret into your Google Cloud project.
Basic configurations
The initial phase of the process involves basic configurations. Once both Google Drive and Google Sheet APIs are enabled, navigate to the “Credentials” tab in the left panel of the API overview page. Click on “Create Credentials” at the top of the page and select “OAuth Client ID.” This action opens a new page where you’ll encounter consent screen configurations.
 Select Auth credentials
The consent screen is a critical element, appearing when users grant necessary permissions for an application using Google OAuth. Configure the consent screen by clicking on “CONFIGURE CONSENT SCREEN” and choosing either the “Internal” or “External” option. Follow the instructions provided for each option, tailoring them to your project’s needs.
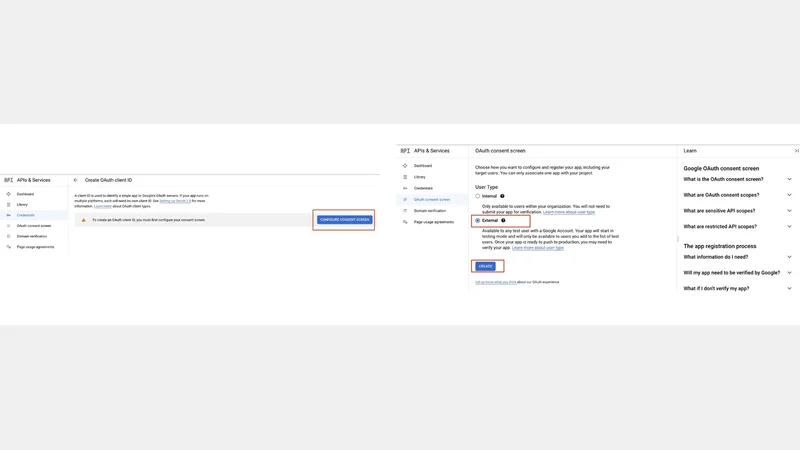 Configure consent screen
App configurations
Moving on to app configurations, provide essential details such as the app name, user support email, and developer contact information. These details are crucial for establishing a clear identity for your OAuth credentials. Save and continue through the subsequent screens, skipping unnecessary sections like “scope.”
 Create OAuth credentials
In the “test users” section, add an email address to grant access during testing. Skipping this step may result in errors when generating a refresh token for the project. Once the consent screen configurations are complete, return to the dashboard and revisit the “Credentials” tab to proceed.
Final configurations
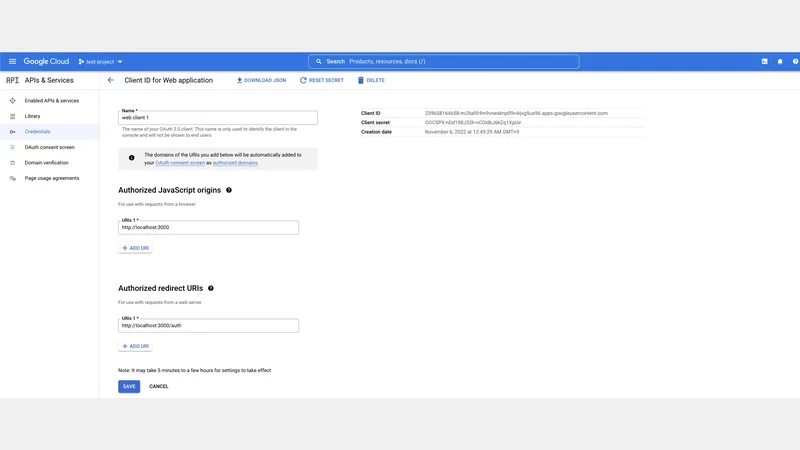
In the final configurations, create OAuth credentials by specifying the application type as “Web application.” Assign a name, such as “web client 1,” to identify the client ID and client secret.
Define Authorized Redirect URIs, ensuring they match the URIs to which your application will be redirected after user authorization. In this tutorial, http://localhost:3000 is set as the callback URI. Clicking “Create” generates the OAuth client ID and client secret. These credentials can be viewed or downloaded in JSON format for future use in production scenarios. It’s advisable to keep this file secure once downloaded. With these OAuth credentials, your application gains the ability to interact securely with Google Drive and Google Sheets APIs.
What is a refresh token?
In the OAuth-based authentication, a refresh token plays a major role as a singularly generated token within a connection established using both the OAuth client ID and the OAuth client secret. Unlike the access token, which is transient and subject to expiration, a refresh token provides a persistent means to obtain new access tokens without the need to retrieve the client ID and client secret with each request. This functionality proves particularly advantageous in scenarios where access tokens have a limited lifespan.
The utility of a refresh token lies in its ability to streamline the process of obtaining fresh access tokens while maintaining the confidentiality of sensitive authentication information. Essentially, once a refresh token is acquired, it serves as a durable credential, eliminating the need for repetitive submission of client credentials in every token request. This not only enhances the security of the authentication process but also significantly improves the efficiency and convenience of token management.
In practical terms, a refresh token empowers applications to refresh their access tokens without requiring user intervention or manual input of credentials. As a result, it ensures a smoother and more secure user experience, particularly in scenarios where prolonged interactions with OAuth-protected resources are prevalent. The use of refresh tokens exemplifies a strategic approach to managing authentication in a manner that balances security, usability, and the dynamic nature of token-based authentication systems.
Create a Node JS project
In the Node.js project for Google Drive APIs and Google Sheets APIs, the initial step is to generate a package.json file by executing the npm init --yes command. The --yes flag expedites this process by bypassing the typical questionnaire associated with the creation of a package.json file using npm.
Subsequently, it becomes imperative to install the requisite packages for the project. The following commands, npm install googleapis and npm install express, facilitate the installation of the essential packages—namely google-APIs and node express.
With the foundational components in place, the next step involves creating the index.js file within the root folder of the Node application. This file assumes the role of the entry point for the Node application.
The initial set of required packages—googleapis, http, url, and express—are imported into index.js:
const { google } = require('googleapis');
const http = require('http');
const url = require('url');
const express = require('express');
Following this, the express app and port are initialized, with 3000 designated as the port:
const app = express();
const PORT = process.env.PORT || 3000;
To establish the necessary constants, replace the placeholder values with the correct ones. These constants encompass CLIENT_ID, CLIENT_SECRET, and REDIRECT_URI. The authClient is then initialized using these parameters:
const CLIENT_ID = '<client ID>';
const CLIENT_SECRET = '<client secret>';
const REDIRECT_URI = 'http://localhost:3000/auth';

const authClient = new google.auth.OAuth2(CLIENT_ID, CLIENT_SECRET, REDIRECT_URI);
Defining the scope of access is a crucial aspect, and the specific URL for Google Drive access is stipulated:
const scopes = [
  'https://www.googleapis.com/auth/drive'
];
Utilizing the generateAuthUrl API in the client object, the authorizationUrl is crafted. This URL encapsulates pertinent information, including permissions and scopes:
const authorizationUrl = authClient.generateAuthUrl({
  access_type: 'offline',
  scope: scopes,
  prompt: 'consent',
  include_granted_scopes: true
});
These preliminary steps lay the groundwork for the integration of Google Drive APIs into a Node.js project, providing the way for interaction with Google Drive functionality programmatically.
API endpoints in Node JS app
In the Node.js application, the creation of API endpoints facilitate communication between the application and Google Drive APIs. The first endpoint, accessible through http://localhost:3000, constitutes the menu screen, offering a simplified interface for users to navigate and interact with various functionalities.
app.get('/', (req, res) => {
  res.send("<a href='http://localhost:3000/grant'>grant</a> to grant required permissions with Google <br><a href='http://localhost:3000/files'>files</a> to print the list of files in drive <br><a href='http://localhost:3000/sheet'>sheet</a> to print contents of the test sheet in drive");
});
The /grant API endpoint serves the purpose of redirecting users to the previously generated authorization URL, initiating the process of granting necessary permissions.
app.get('/grant', async (req, res) => {
  res.redirect(authorizationUrl)
});
A critical API endpoint, /auth, acts as the callback mechanism triggered once the user has granted essential permissions for the application. This endpoint receives token details, including the access token, refresh token, and access token expiration date, within the request. The refresh token is extracted and stored for future use.
app.get('/auth', async (req, res) => {
  console.log(req);

  if (req.url.startsWith('/auth')) {
    let q = url.parse(req.url, true).query;
    console.log(q)
    let {
      tokens
    } = await authClient.getToken(q.code);
    console.log(tokens);
    // store the refresh token in your persistence storage. Check this doc to see how to use the refresh token
    // https://developers.google.com/identity/protocols/oauth2/web-server#offline
    authClient.setCredentials(tokens);
  }
  res.redirect('/')
});
These API endpoints lay the groundwork for the interaction between the Node.js application and Google Drive APIs, enabling users to navigate, grant permissions, and interact with files and sheets programmatically.
Create the /files endpoint
In our Node.js application, two essential API endpoints, /files and /sheet, are designed to facilitate specific functionalities tied to Google Drive interactions.
The /files endpoint is tailored for retrieving a list of files from Google Drive. Leveraging the Google Drive API, this endpoint utilizes the files.list method to obtain a list of files, including their unique identifiers and names. The response is then meticulously processed, presenting the user with a detailed summary of each file in the specified format.
app.get('/files', async (req, res) => {

  const googleDrive = google.drive({
    version: "v3",
    auth: authClient
  });

  let myFiles = "";
  try {
    googleDrive.files.list({
      pageSize: 4,
      fields: 'nextPageToken, files(id, name)',
    }, (err, response) => {
      if (err) return res.send(`Error: ${err} <br> <a href='http://localhost:3000/'>menu</a>`);
      if (response.data.files.length) {
        response.data.files.map((file) => {
          console.log(`${file.name} (${file.id})`);
          myFiles = myFiles + `${file.name} (${file.id}) <br>`
        });
        res.send(myFiles + "<br> <a href='http://localhost:3000/'>menu</a>");
      } else {
        res.send("No data found in google sheet <br> <a href='http://localhost:3000/'>menu</a>");
      }
    });

  } catch (error) {
    res.send(`Error: ${error.message} <br> <a href='http://localhost:3000/'>menu</a>`);
  }

});
On the other hand, the /sheet endpoint is designed to extract contents from a specific spreadsheet within Google Drive. In this context, the targeted spreadsheet is denoted by a unique identifier. The endpoint employs the Google Sheets API to fetch the data from the specified sheet, enabling the application to present the user with relevant information.
app.get('/sheet', async (req, res) => {
  // Unique ID for the test sheet in Google Drive
  const sheetId = "1v0axJ5n0f1byTVO9tpAvDQmbCm6UYcZLc2viL6pnYsY";

  // Implementation to retrieve data from the sheet goes here

  res.send(`Sheet data retrieval functionality will be implemented here <br> <a href='http://localhost:3000/'>menu</a>`);
});
These crafted endpoints signify a pivotal step in our Node.js application’s development, providing users with the capability to interact with their Google Drive files and sheet data .
Make sure to replace this spreadsheet ID with yours before running the application.
app.get('/sheet', async (req, res) => {

  const sheets = google.sheets({
    version: 'v4',
    auth: authClient
  });

  let sheet = "";
  try {
    sheets.spreadsheets.values.get({
      spreadsheetId: '1v0axJ5n0f1byTVO9tpAvDQmbCm6UYcZLc2viL6pnYsY',
      range: 'A:B',
    }, (err, response) => {
      if (err) return res.send(`Error: ${err} <br> <a href='http://localhost:3000/'>menu</a>`);
      const rows = response.data.values;
      if (rows.length) {
        rows.map((row) => {
          console.log(`${row[0]}, ${row[1]}`);
          sheet = sheet + `${row[0]}, ${row[1]} <br>`
        });
        res.send(sheet + "<br> <a href='http://localhost:3000/'>menu</a>");
      } else {
        res.send("No data found in google sheet <br> <a href='http://localhost:3000/'>menu</a>");
      }
    });
  } catch (error) {
    res.send(`Error: ${error.message} <br> <a href='http://localhost:3000/'>menu</a>`);
  }
});
Concluding the development of our Node.js application, the final touch involves configuring our Node server to listen on a specified port, in this case, http://localhost:3000. This step ensures that the server is active and ready to handle incoming requests.
app.listen(PORT, function (err) {
  if (err) console.log(err);
  console.log("Server listening on PORT", PORT);
});
By incorporating the above code snippet into our index.js file, we effectively initiate the server, and any potential errors during the process are logged for troubleshooting purposes. The successful execution of this script prints a confirmation message in the console, indicating that the server is now actively listening on the specified port, which, in this instance, is 3000. This marks the completion of the server setup, and the application is now accessible through the designated local host address.
Conclusion
To conclude, this project has provided a practical guide on incorporating Google Drive and Google Sheets APIs within a Node.js application. By following the steps outlined, you’ve learned how to enable these APIs in the Google Cloud Console, create essential OAuth credentials, and subsequently build an Express application with dedicated API endpoints. The tutorial has covered aspects ranging from consent screen configurations to the establishment of OAuth client IDs and client secrets. The provided code snippets and explanations serve as a valuable resource for developers looking to integrate Google Drive and Google Sheets functionalities into their projects.
For hands-on experience and further exploration, the project’s complete source code is available for download on GitHub. This resource offers a tangible reference point, allowing you to delve deeper into the intricacies of working with these powerful APIs.
FAQ
Q: Is Google Drive API a REST API?
A: Yes. Check this out for more details.
Q: How to use Google Drive API in node JS?
A: Refer to Enable Google Sheet API section in this post.
Q: Can I upload file to google drive using nodejs?
A:Yes. Checkout this document.
Comments
There are no comments yet.